BeSkilled Studio guide
How to use Studio to build certifications and write microlessons. For the team testing Studio at studio.beskilled.ai.
Contents
- Sign in, roles and invites
- Find your way
- Frameworks
- Certifications
- Libraries: personas and scenes
- Content: upload documents
- Microlessons
- Preview
- Report a problem
1. Sign in, roles and invites
How to sign in with an email code
- Open studio.beskilled.ai. Studio sends you to the screen
Sign in to BeSkilled
. - Type your email and choose
Continue
. - Open the email from BeSkilled and type the 6-digit code in
Code
. - Choose
Sign in
. Studio opens on Home.
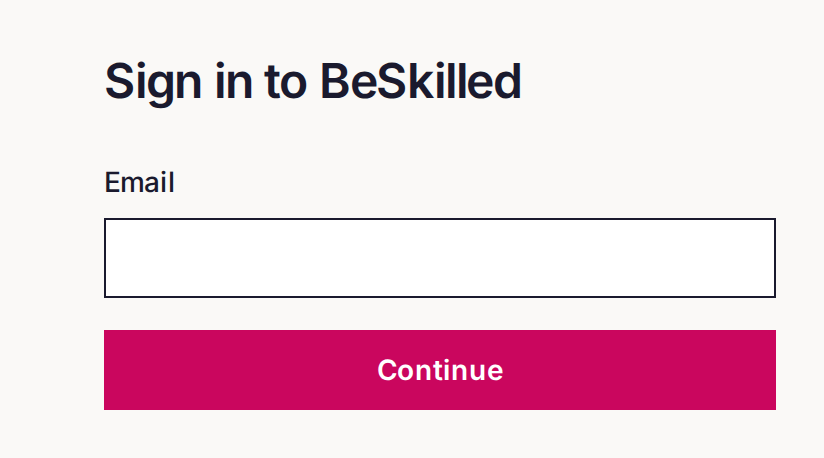
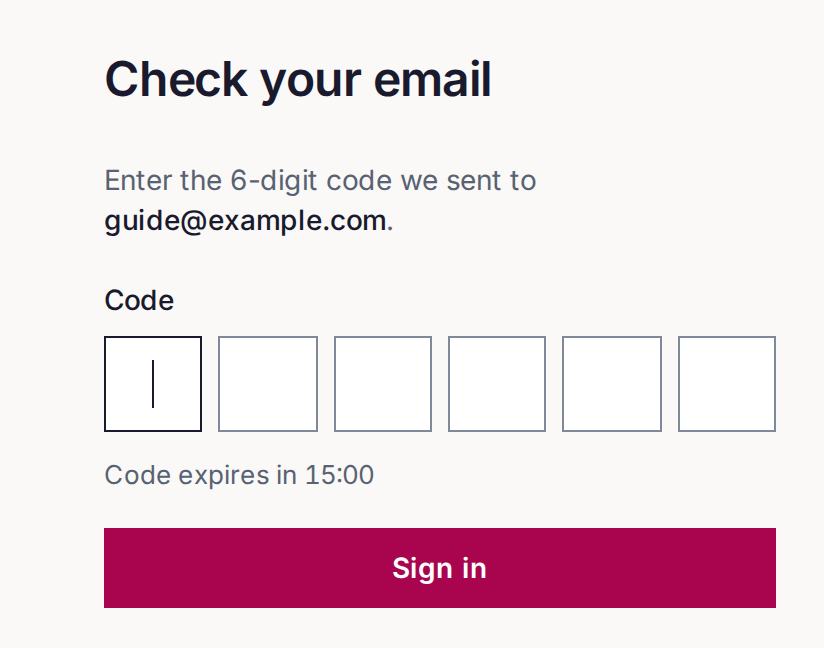
The code works for 15 minutes. If it expires, choose Send a new code
. To change the address, choose Use a different email
.
How to sign in with Google
Google sign-in works only after you link Google to your account.
- Sign in once with an email code.
- Open your name at the foot of the left sidebar and choose
Your profile
. - Under
Alternate login
, chooseLink Google
. Studio emails you a code to confirm, then sends you on withContinue to Google
. - Next time, choose
Continue with Google
on the sign-in screen.
Roles
Each person in Studio has one role. An Owner can change what a role allows in Team, so your team can differ from this default table.
| What you can do | Owner | Super Admin | Instructional Designer |
|---|---|---|---|
| Add, rename and archive certifications, specialties and capabilities | Yes | Yes | No |
| Assign capabilities to people | Yes | Yes | No |
| Write a capability's brief and lesson map | Yes | Yes | If assigned |
| Create and edit microlessons | Yes | Yes | Yes |
| Review microlessons (comment, send back) | Yes | Yes | Yes |
| Approve microlessons | Yes | Yes | No, but can mark Ready for approval |
| Create, edit and archive frameworks, library entries and content | Yes | Yes | Yes |
| Delete and restore anything | Yes | Yes | No |
| See the team, invite people, read the audit trail | Yes | Yes | No |
| Give the Owner or Super Admin role, edit permissions | Yes | No | No |
A reviewer is not a role. When you send a microlesson for review, you choose a person as its reviewer.
How to invite someone
- Open
Team
in the sidebar and chooseInvite someone
. - Type the
Name
andEmail
, and choose aRole
. - Choose
Send invitation
.
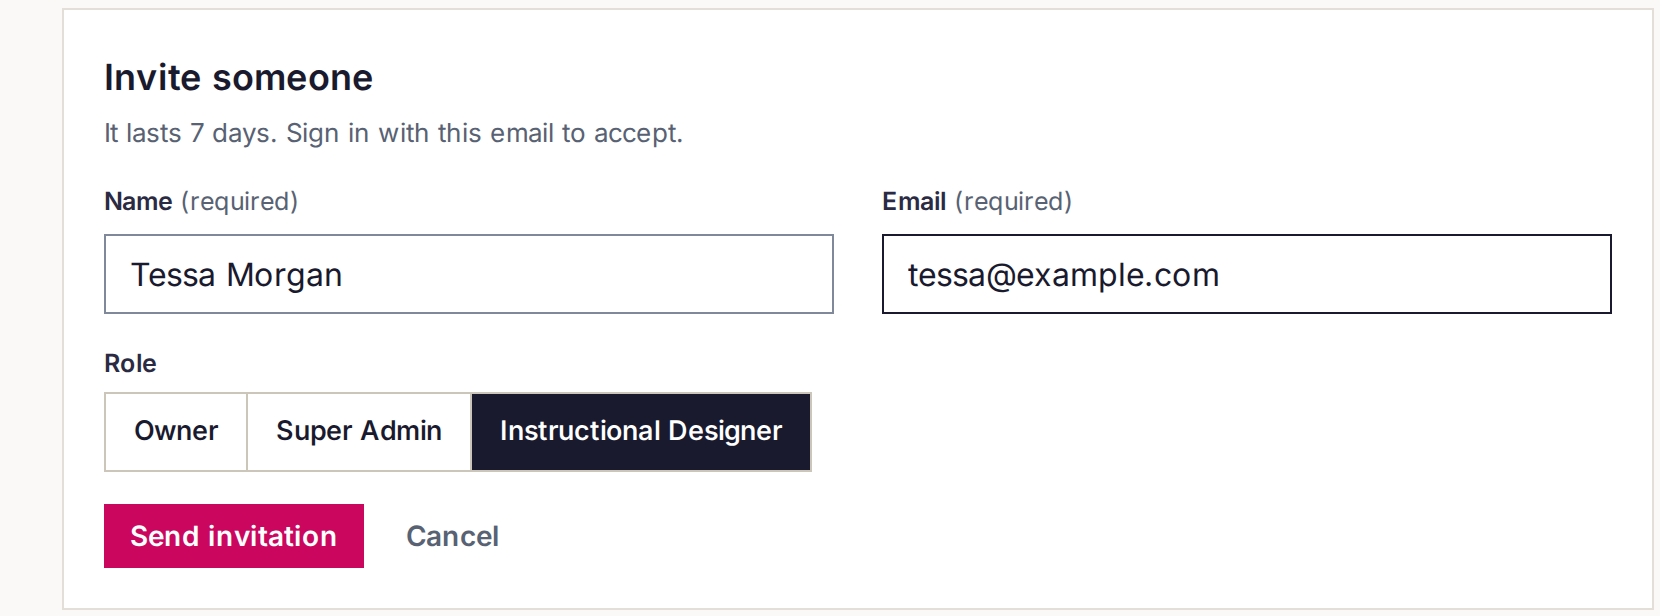
The invitation lasts 7 days. The person accepts it when they sign in with that email. A person with no role sees Your account cannot open Studio yet
.
2. Find your way
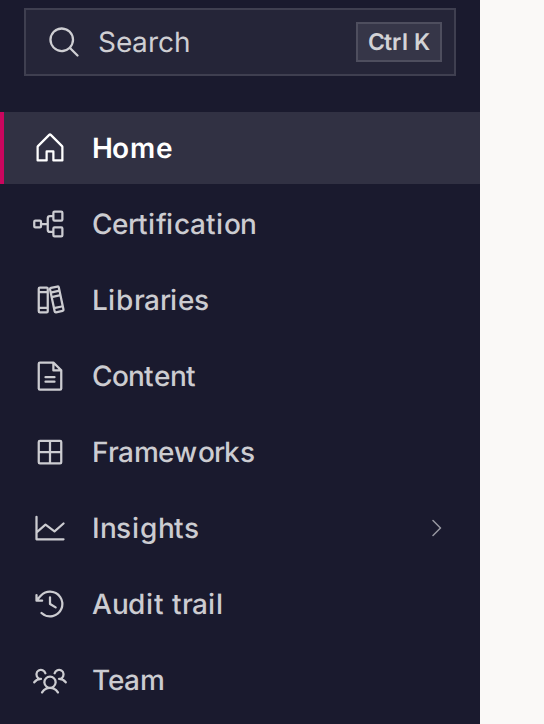
The dark sidebar on the left holds every page. You see only the pages your role allows.
| Page | What it is for |
|---|---|
Search | Find any certification, capability, microlesson, entry or document. Shortcut: Ctrl+K or Cmd+K. |
Home | Your work: Waiting on you, Recently openedand the progress of each certification. Choose a certification's name to open it in Certification. |
Certification | Every certification, specialty and capability, and who holds each capability. |
Libraries | Personas, scenes and the other pieces that microlessons reuse. |
Content | Source documents that the AI reads. |
Frameworks | The patterns that shape capabilities and microlessons. |
Team, Audit trail, Insights | People and roles, a log of changes, and waitlist numbers. Owners and Super Admins only. |
The bell above your name shows notifications, for example when someone sends you a microlesson to review. Your name at the foot opens Your profile
and Sign out
.
How the parts fit together
- A framework sets the pattern.
- A certification holds specialties, and each specialty holds capabilities.
- A capability holds microlessons. You build them in four steps:
Content and frameworks
,Brief
,Lesson map
andMicrolesson content
. - Libraries and Content give the AI the people, situations and source material to write from.
3. Frameworks
A framework is a pattern that you write once and use many times: its steps, its rules and, for lessons, the sections each lesson is built from.
Studio has two kinds:
- Capability framework: the steps a whole capability covers, in order. Each step becomes one microlesson.
- Lesson framework: the steps one lesson teaches, and its
Lesson shape
(the sections each lesson is built from).
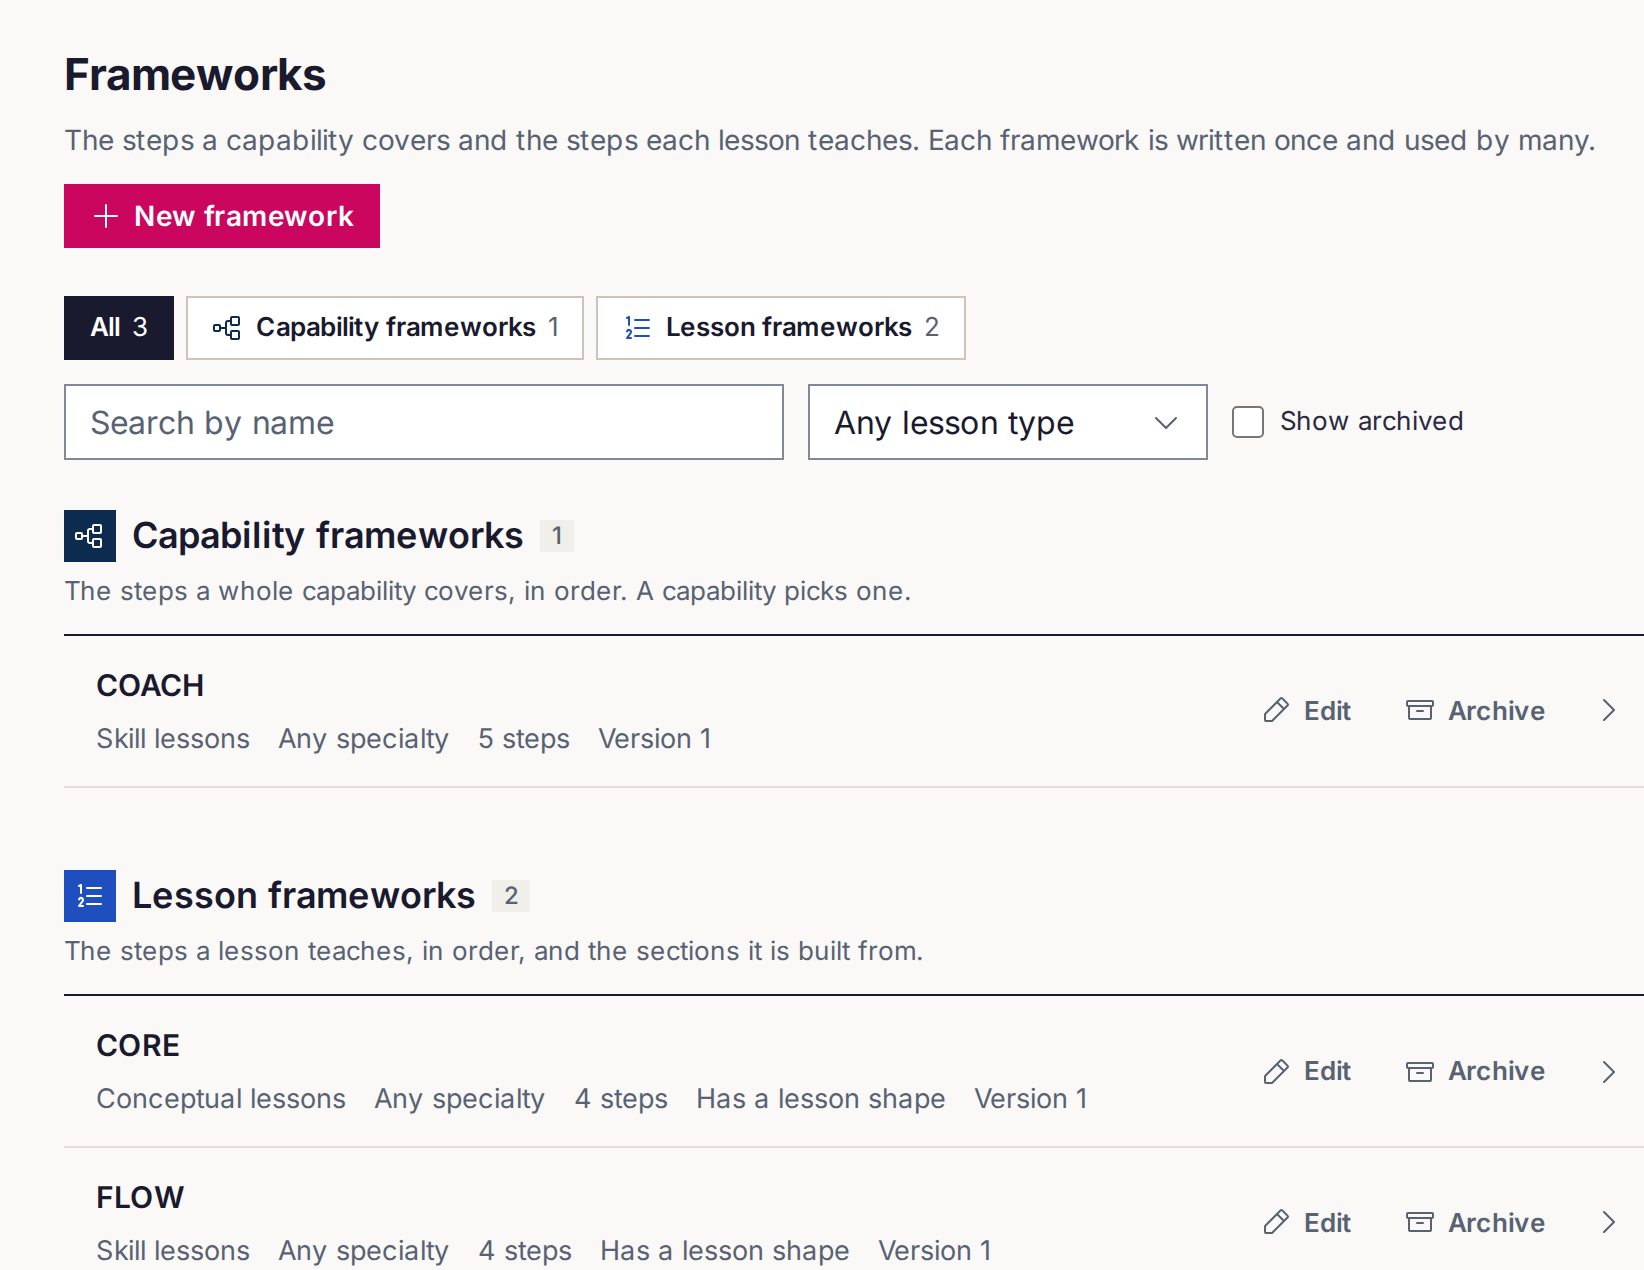
The frameworks in Studio now
| Name | Kind | Steps | Rules |
|---|---|---|---|
| COACH | Capability framework | Connect with Intent, Observe & Diagnose, Acknowledge Strengths, Challenge, Head into Action. Its default lesson framework is FLOW. | In order. Every step must be included. |
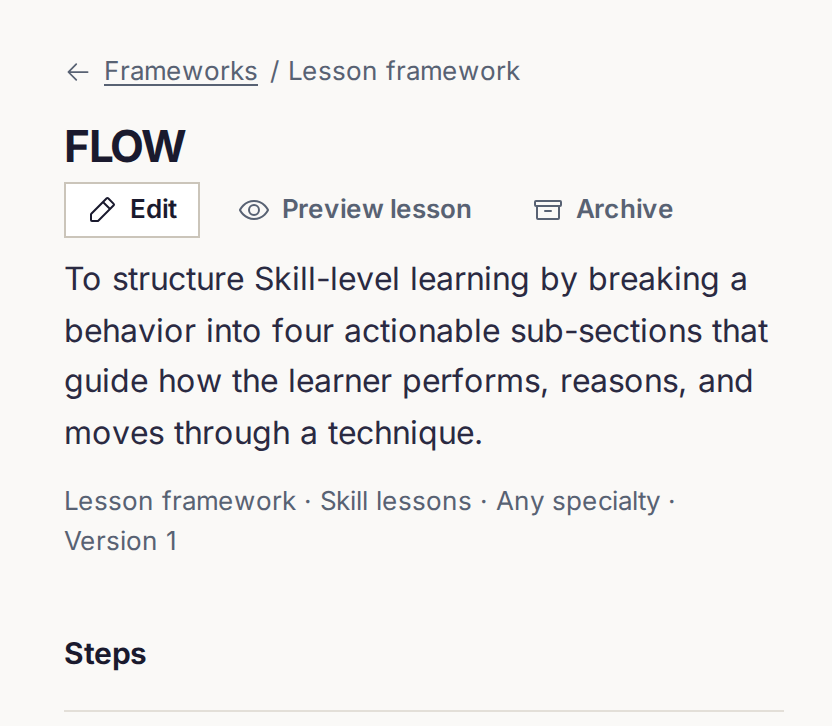
| FLOW | Lesson framework, skill lessons | Frame, Learn, Outcome, Way Forward | In order. Every substep must be included. |
| CORE | Lesson framework, conceptual lessons | Clarify, Observe, Relate, Execute | Any order. Substeps can be left out. |
A FLOW lesson has 12 sections: Objective, Your First Take, Demo, one Learn section for each of the 4 steps, Make It Your Own, Practice Level 1, 2 and 3, and Completion.
How to view a framework
- Open
Frameworks
. Use the type buttons,Search by name
orLesson type
to narrow the list. - Choose a framework, for example FLOW. You see its purpose, steps, rules and lesson shape.
- Choose
Preview lesson
(orPreview capability
) to see the structure it makes.
How to create a framework
- On
Frameworks
, chooseNew framework
. - Choose
Capability framework
orLesson framework
. - Fill in
Name
andPurpose
. For a lesson framework, choose theLesson type
. You cannot change the lesson type later. - Add steps with
Add a step
. Give each step a name and a definition. Use the arrows or drag to reorder them. - For a lesson framework, choose
Add a lesson shape
to set its sections. The preview on the right follows your edits. - Choose the create button, for example
Create lesson framework
.
How to edit a framework
- Open the framework and choose
Edit
. - Make your changes and choose
Save
. Studio saysSaved as version N.
Microlessons keep the framework version they were made with. The framework page lists who uses it. You can move draft microlessons to the new version from there.
To go back, choose See version history
, pick a version and choose Restore this version
. To retire a framework, archive it. You can undo the archive from the message that appears.
4. Certifications
A certification holds specialties, a specialty holds capabilities, and a capability holds microlessons.
Example from Studio now:
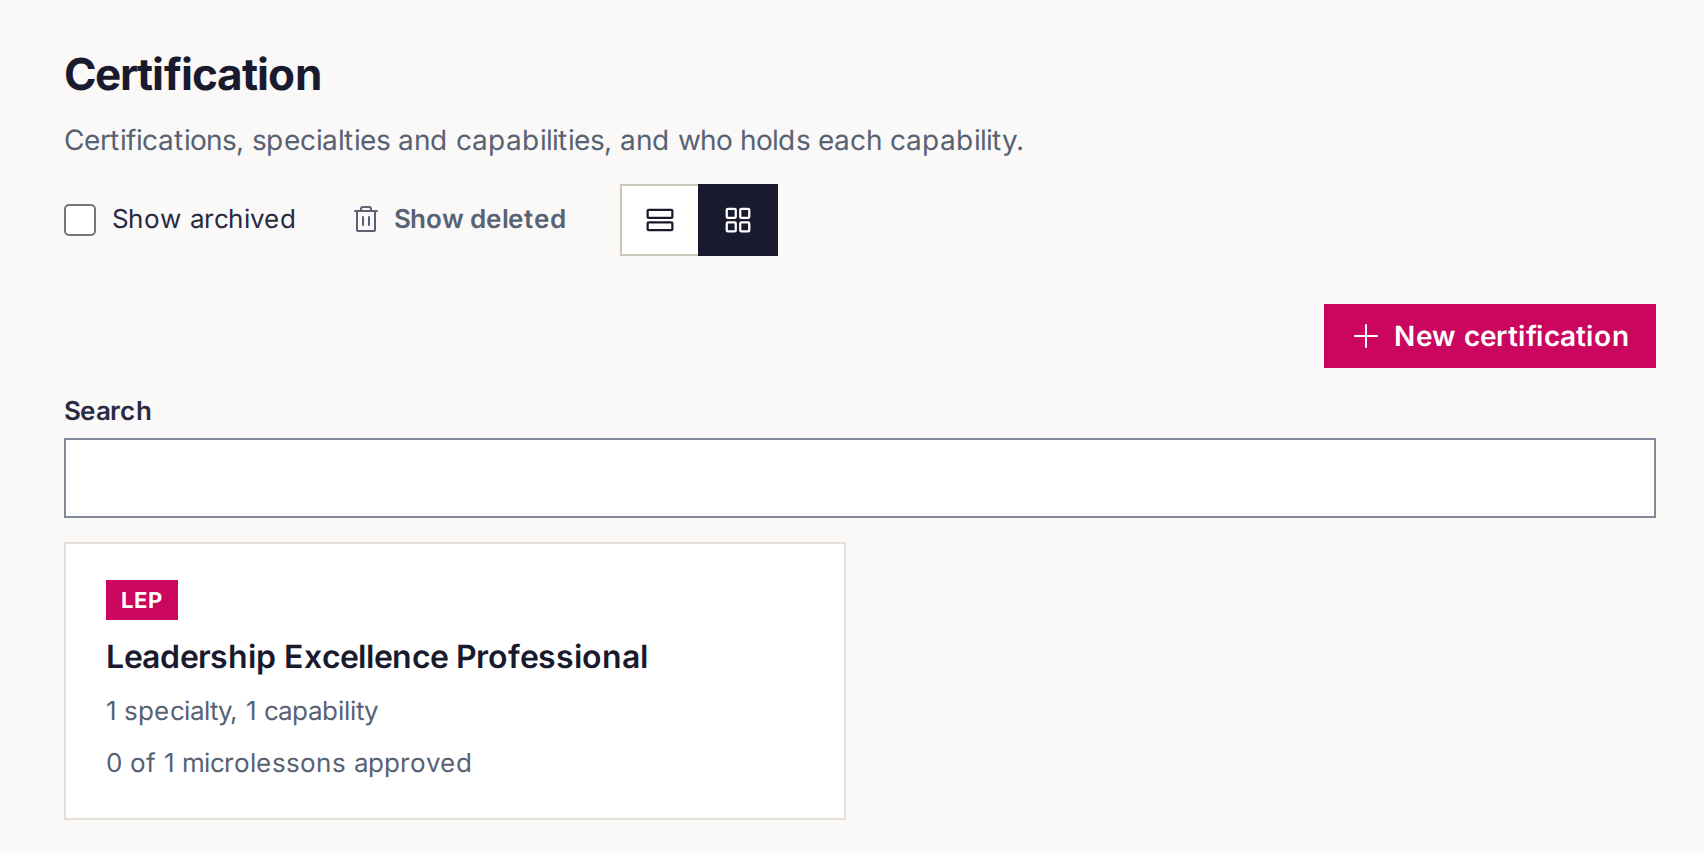
- Certification: LEP, Leadership Excellence Professional
- Specialty: Professional Communication Essentials
- Capability: Map the Skills, Mark the Focus
Each level has a short code that you can never change. A certification code has 2 to 8 capital letters or digits. A specialty or capability code has 2 to 6, and Studio puts the parent's code and an underscore in front of it, for example LEP_
. Studio suggests a code from the name.
The two views
Compact
: a table of capabilities, with search, filters (Certification
,Specialty
,Holder
,Stage
) and pages. A certification with no capabilities yet has its own row under the table, withAdd a specialty
.Cards
: one card per certification. Open a card to see its specialties, then a specialty to see its capabilities.
How to create a certification, a specialty and a capability
- Open
Certification
and chooseCards
. - Choose
New certification
. Type theName
, check theShort code
, and chooseCreate certification
. - Open the certification card and choose
New specialty
. Fill in the dialog and chooseCreate specialty
. - Open the specialty and choose
New capability
. Fill in the dialog and chooseCreate capability
.
You can also choose New certification
in Compact. Studio then shows only the new certification, in its own row with Add a specialty
. Choose Show all capabilities
to see everything again.
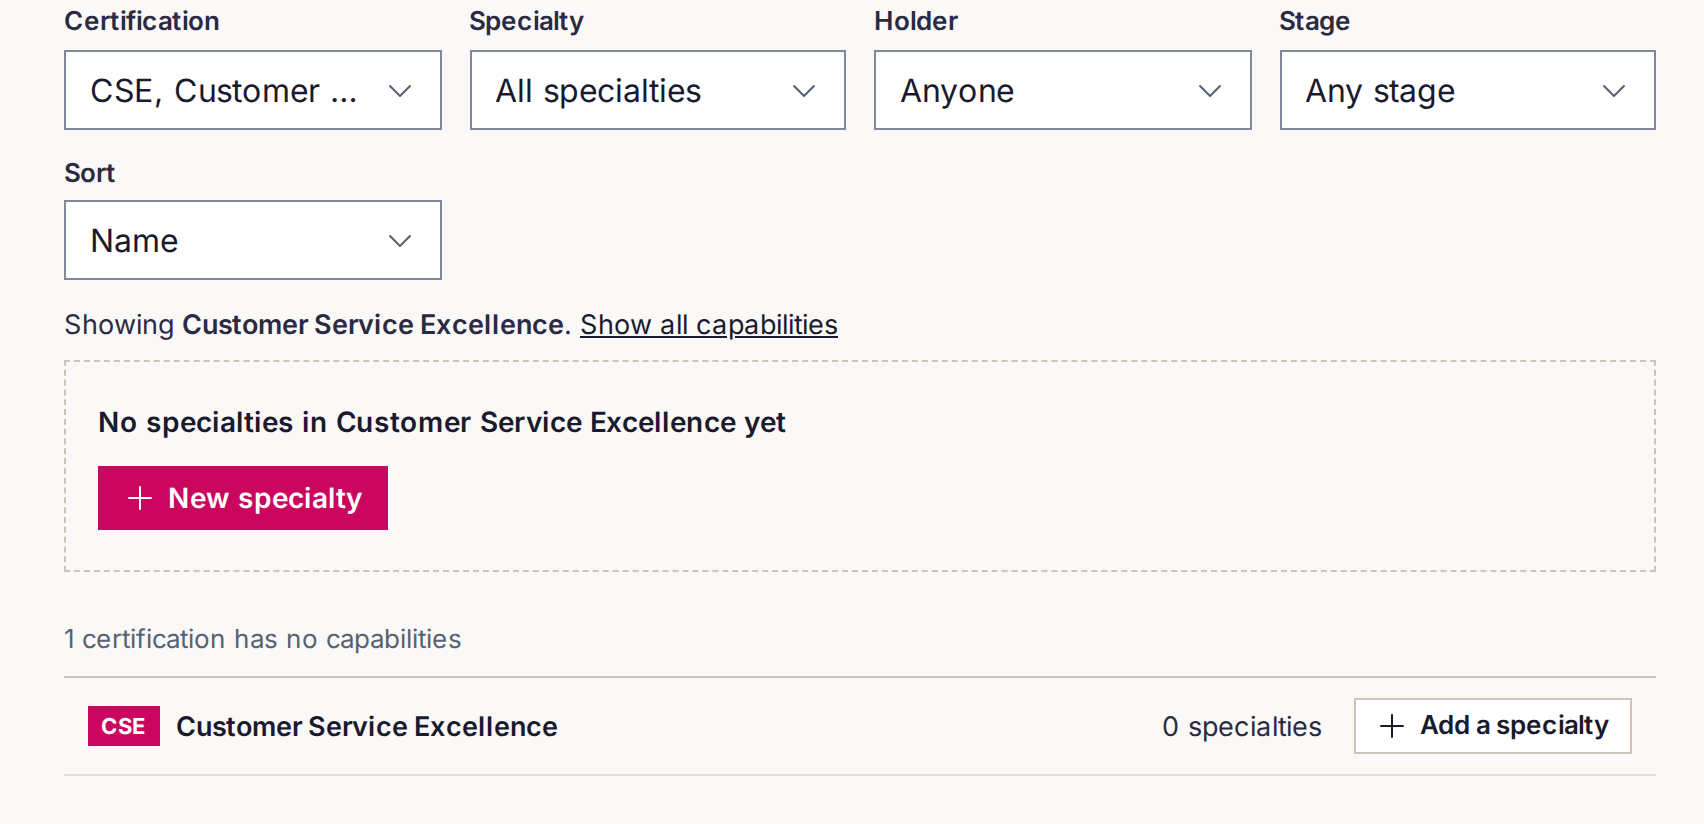
Certificationfilter shows the new certification (1), and its row has
Add a specialty(2).
How to assign a capability holder
One person holds the whole capability: its brief, its lesson map and, to start with, every microlesson in it.
- Find the capability and open its menu,
Actions for <name>
(the three dots). - Choose
Assign
(orReassign
if someone holds it). - Choose a person in
Holder
. Only people who can write microlessons are listed. - Choose
Assign
.
How to rename, archive, restore and delete
- Rename: open the menu, choose
Rename
, thenSave name
. For a certification or specialty,Edit objective
is there too. - Archive: open the menu, choose
Archive
, then confirm. Everything inside is archived with it. You can chooseUndo
in the message that appears. - See archived items: tick
Show archived
. Open an archived item's menu and chooseUnarchive
to bring it back. - Delete: you can delete only an archived item. Open its menu and choose
Delete
, then confirm. Owners and Super Admins only. - Restore a deleted item: choose
Show deleted
, find the item and chooseRestore
.
5. Libraries: personas and scenes
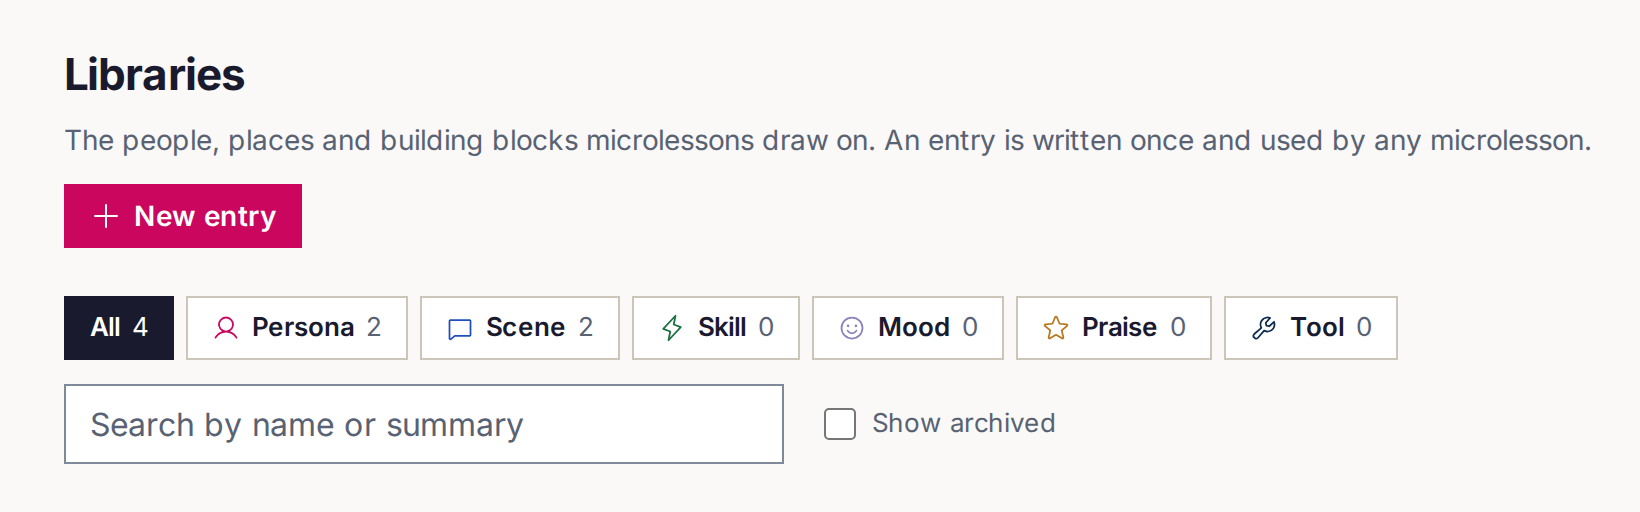
A library entry is a reusable piece that you write once and any microlesson can use.
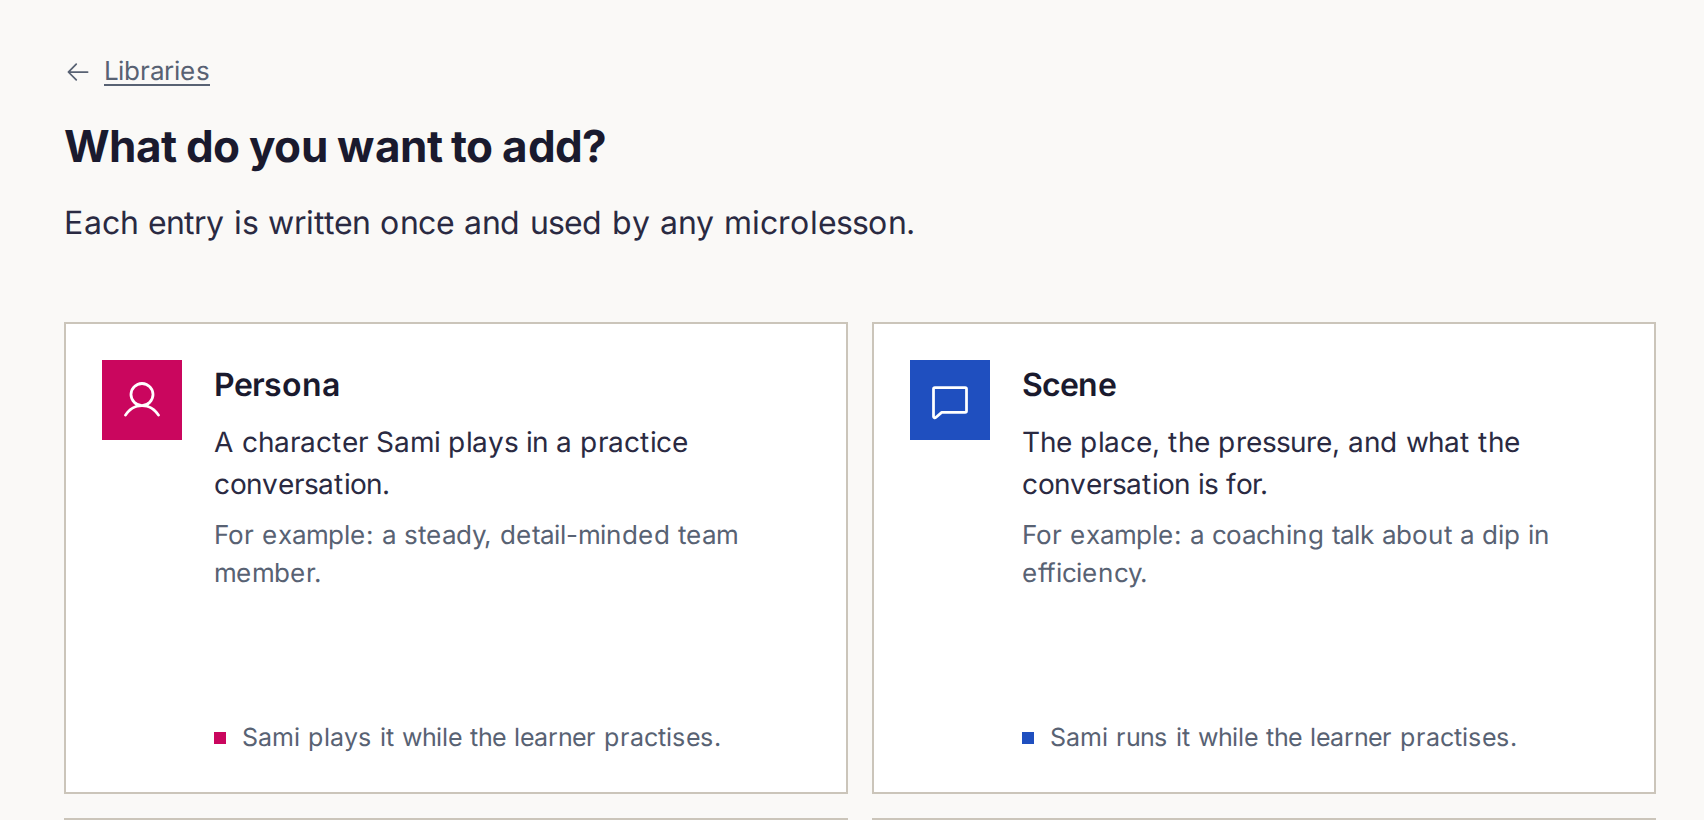
- Persona: a character that SAMI plays in a practice conversation. Examples: Marcus, Maya.
- Scene: the place, the pressure and what the conversation is for. Examples:
Coach to Ignite · KPI Conversation (Marcus)
andCustomer Feedback Conversation (Maya)
.
Libraries also hold skills, moods, praise and tools.
How to create a persona
- Open
Libraries
and chooseNew entry
, thenPersona
. - Fill in
Name
and the short description. - Fill in
Who they are
(pronouns, age, role and title, industry),How they speak and respond
andGuardrails
. - Choose
Create persona
.
How to create a scene and link a persona to it
- In
Libraries
, chooseNew entry
, thenScene
. - Fill in the name and short description.
- Under
Who and when
, choose aPersona
, for example Maya. Only active personas are listed. Tick the practice levels the scene is for:Level 1
,Level 2
,Level 3 (transfer)
. - Fill in
Setting
.KPI context
is required, one item per line. - Fill in
How it feels
,Boundaries
andAt runtime
as needed. - Choose
Create scene
.
How to edit an entry
- Open the entry and choose
Edit
. - Change what you need and choose
Save
. Studio saysSaved as version N.
The side of the entry page shows which scenes and microlessons use it. Microlessons keep the version they use until someone moves them to the newer one. See version history
shows each version. Choose Archive
to retire an entry, and Unarchive
to bring it back.
6. Content: upload documents
A content document is a source file that the AI reads when it writes briefs and microlessons.
| Type | Use it for | Examples in Studio now |
|---|---|---|
Brief | What a lesson teaches | What Coaching IS…and ISN'T, Promoting Self Discovery, Practice with Purpose |
Tool | Something the learner opens or works from | Map the Skills, Mark the Focus |
Reference | Background and past lessons to draw on |
How to upload documents
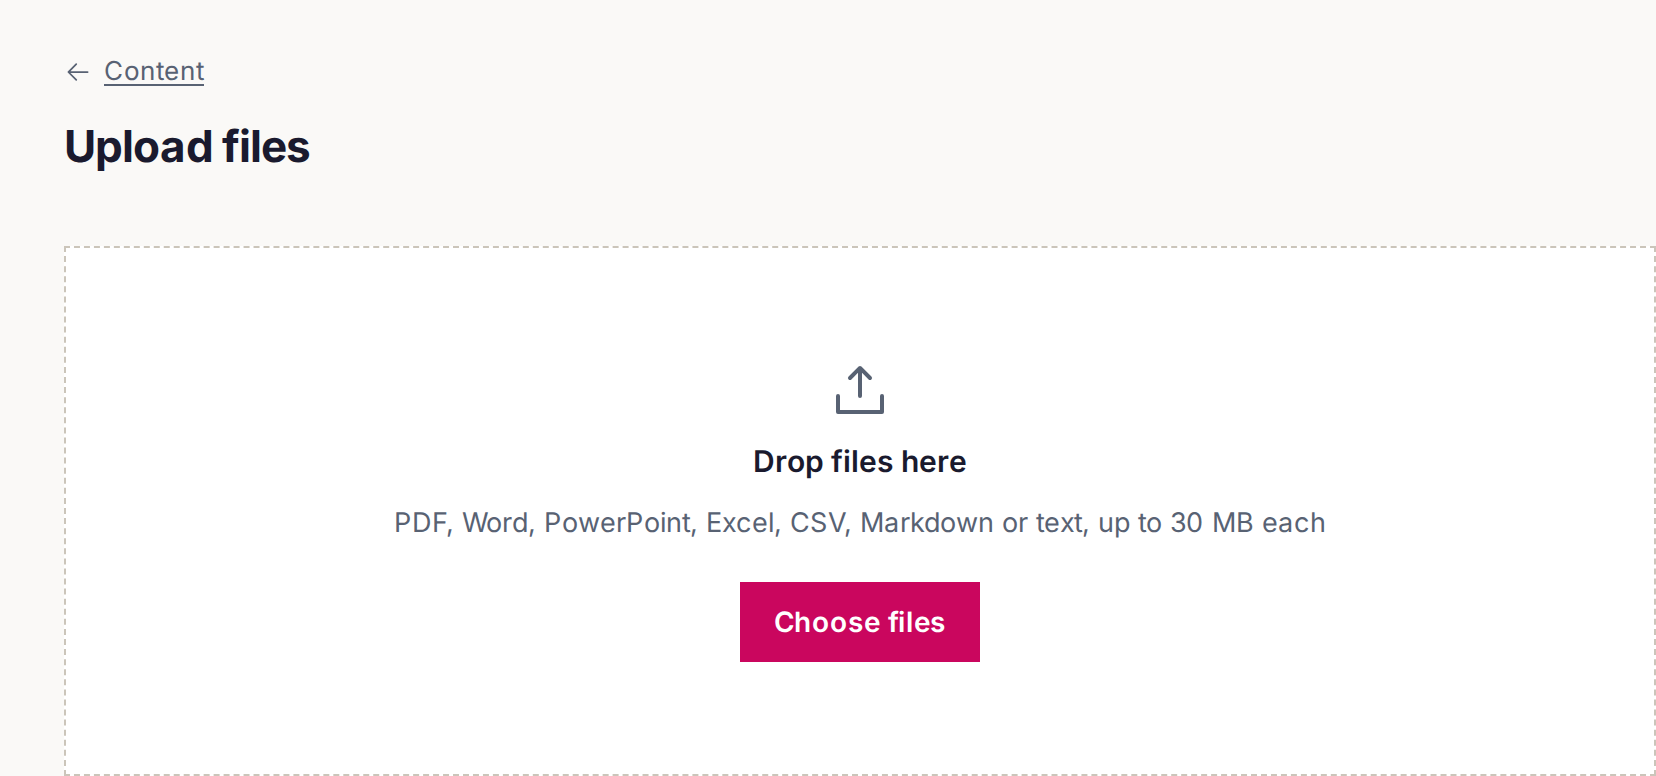
- Open
Content
and chooseUpload files
. - Drop files on the page, or choose
Choose files
. You can add PDF, Word, PowerPoint, Excel, CSV, Markdown or text files, up to 30 MB each and 10 at a time. - Check the
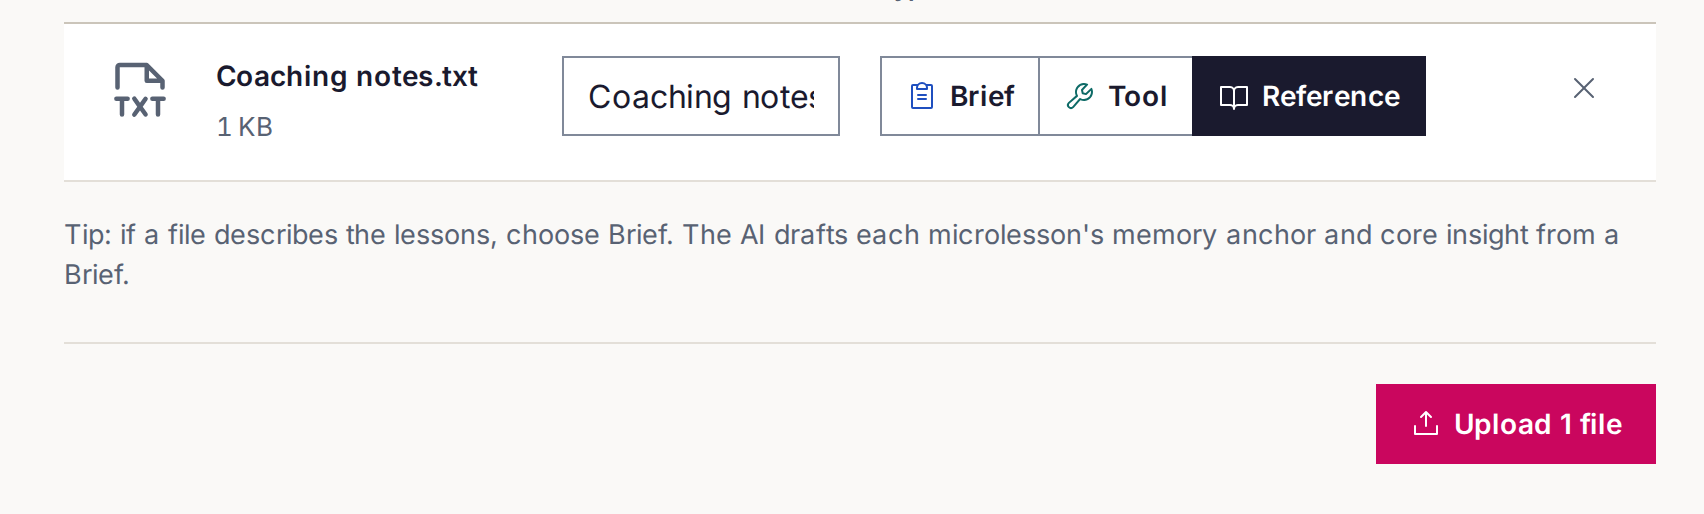
Title
of each file and choose itsType
.Set all to
sets one type for every file. Tip: if a file describes the lessons, chooseBrief
. - Choose
Upload N files
. - Wait while each row says
Processing
. It changes toReady
after about 30 seconds.
If a file has a password, type it and choose Unlock
. If a row fails, choose Try again
.
How to open a document
- On
Content
, choose the document in the list. - Read its text. The side boxes show the
Source file
, theAI reading
state (Ready
when the AI can use it) and which capabilities and microlessons use it.
You can also write a document in Studio with New document
.
7. Microlessons
A microlesson is one short lesson inside a capability, built from sections, and each section is built from steps.
How to open a capability
- Open
Certification
. - Choose the capability, for example
Map the Skills, Mark the Focus
. In Cards view, open the certification, then the specialty first. - The capability page shows four steps across the top:
Content and frameworks
,Brief
,Lesson map
,Microlesson content
. A step does not block the next one.
Step 1: content and frameworks
- Under
Content
, chooseAttach from Content
to pick documents, orUpload files
to add new ones. - Under
Frameworks
, choose theCapability framework
, for example COACH. This also sets theMicrolesson framework
to its default, FLOW. You can change it, or chooseNone
orNot applicable
. - Choose a route:
Draft the microlessons with AI
orWrite them yourself
.
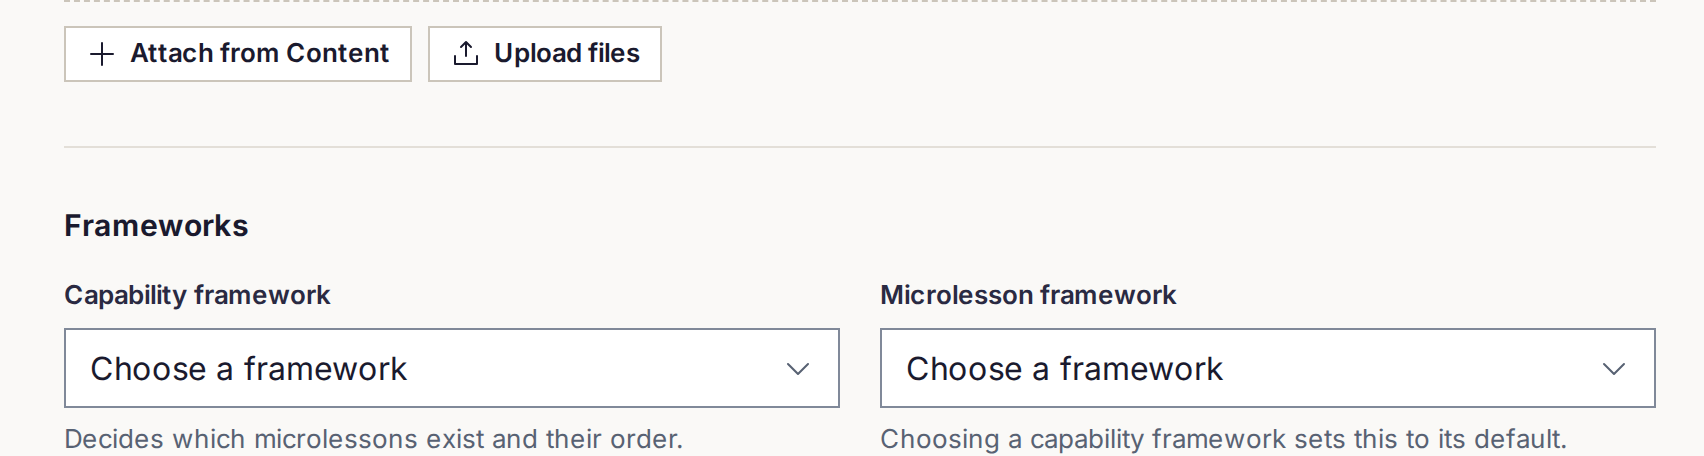
Draft the microlessons with AIstays off and says
Choose the microlesson framework first.
Step 2: write the brief and objective
The capability brief says what the capability is for and what every microlesson must follow.
- With the AI: the AI asks you questions. Pick an answer or type your own and choose
Send
. Studio showsThe AI is thinking
while it prepares the next question. Each answer is added toBrief so far
. - Yourself: write the
Objective
. ChooseAdd a detail
for each rule, with a name and a value.
Choose Save the brief
. Studio says Brief saved.
The lesson map is drafted from the saved brief.
Step 3: add microlessons to the lesson map
- With the AI: choose
Draft the lesson map with AI
. Check the proposed microlessons. ChooseEdit
on one to fix its title or brief, thenDone
. ChooseAccept lesson map
, then confirm withAccept and create N
. - Yourself: choose
Add a microlesson
. Fill inTitle
andWhat it teaches
, and chooseAdd to the map
.
Move microlessons up or down and choose Save order
. The menu on each microlesson has Duplicate
. A copy goes to Unplaced
until you choose Place at the end
.
Step 4: write the microlesson
On Microlesson content
, choose Draft with AI
on a microlesson, or open it. The microlesson page has two tabs: Lesson
and Brief and links
.
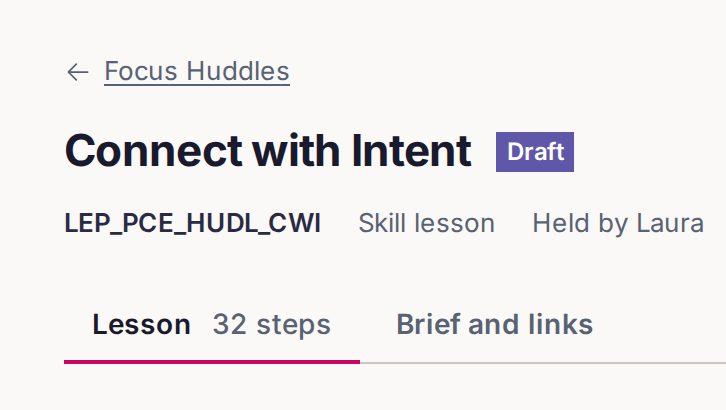
How to choose the lesson framework
- Open the
Brief and links
tab. - Under
Framework
, choose theLesson framework
, for example FLOW, orNo framework
. The capability's default is chosen for you when it has one.
How to edit the microlesson brief
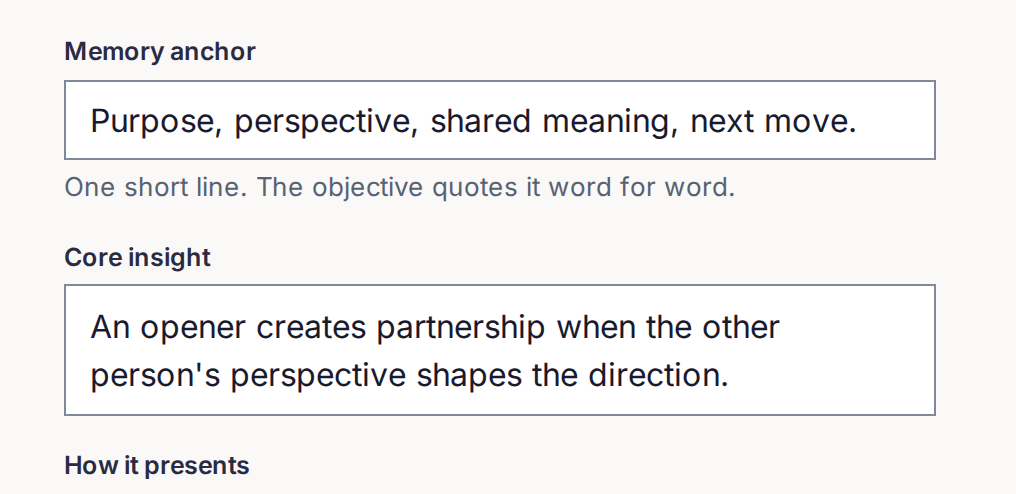
On Brief and links
, fill in What the lesson teaches
, the Memory anchor
(one short line the objective quotes word for word) and the Core insight
. For a skill lesson, choose the Critical step
. Under How it presents
, keep Let the AI choose
or pick another option. Studio saves as you type.
How to draft with AI
- Make sure a lesson framework is chosen and the brief is written. Without them, Studio asks you to
Write the brief
first. - On the
Lesson
tab, chooseWrite the outline
. The AI proposes the sections. - Check the outline. Change a section title if you need to. Choose
Accept outline and write sections
. - The AI writes the sections, 3 at a time. When it finishes, choose
Read the N written sections
. - For each section, choose
Accept
,Edit
thenAccept
, orReject
. Nothing changes in the lesson until you accept. If some sections fail, chooseTry the N failed again
.
To write by hand instead, use Or write it yourself
to lay out empty sections, then Add a step
in each.
How to use the AI assistant
- Open
AI assistant
. Type your request inMessage the AI
, or choose a quick ask such asShorter
orDraft this section
. - When the answer lists
Offered changes
, chooseRun
on the change you want. Nothing happens until you pressRun
. - The AI shows a proposal. Choose
Accept
orReject
.
On an empty section, Draft with AI
opens the assistant with Draft this section
.
How to link a persona or scene for role-play
Role-play steps sit in the practice sections. You link the persona and scene to the microlesson, not to a single step.
- Open
Brief and links
and findLibrary entries
. - Choose
Add a persona
, for example Maya, andAdd a scene
, for exampleCustomer Feedback Conversation (Maya)
. - To use a different character at one practice level, set
Persona for level N
orScene for level N
.Same as above
means the level uses the main ones.
When a newer version of an entry exists, the link says Version N available
. Choose Use version N
to move to it.
How to see and restore revisions
Studio saves every change as a revision. The top of the page says Saving
, Saved
or Not saved
.
- Choose
See version history
. The list shows who saved each revision. - Choose a revision, then
Restore revision N
, thenRestore
. Studio saves it as the newest revision.
If someone else saved while you were editing, Studio tells you. Choose Load revision N
to get their version.
How to send for review, comment, return and approve
- The author fixes every gap that the review box lists. Then the author chooses
Send for review
, picks theReviewer
and choosesSend to <name>
. The microlesson is locked while in review. - The reviewer opens it from
Waiting on you
on Home or from the bell. The reviewer usesComment on <field>
on any part, types a note and choosesComment
. - The reviewer chooses
Send back
to return it, orApprove
. An Instructional Designer who cannot approve choosesReady for approval
, and an Owner or Super Admin approves. - When the microlesson comes back, the author answers each comment with
Reply
orResolve
, makes the changes and choosesSend again
. - An approved microlesson is
Locked: approved
. ChooseReopen
to edit it again. It goes back to draft.
To give a microlesson to another author, choose More actions
, then Hand to someone
.
Stages and their colours
| Stage | Colour | Meaning |
|---|---|---|
| Not started | Grey outline | Nothing written yet. |
| Being written | Blue | The AI is writing it. |
| Draft | Lavender | Written, not yet sent for review. |
| In review | Amber | With a reviewer. |
| Returned | Magenta | The reviewer sent it back with comments. |
| Approved | Dark green | Approved and locked. |
| Published | Green | Live for learners. |
How to archive a microlesson
- Choose
More actions
, thenArchive
. - Confirm. The page then says
This microlesson is archived.
Worked example: a FLOW lesson with a Maya role-play
- Open
Certification
, then LEP, then Professional Communication Essentials, thenMap the Skills, Mark the Focus
. - On
Content and frameworks
, chooseAttach from Content
and pick the toolMap the Skills, Mark the Focus
and the briefPractice with Purpose
. ChooseAttach
. - Set the
Microlesson framework
to FLOW. - On
Brief
, write theObjective
, for example: Map a team member's skills and mark the one to focus on next. ChooseSave the brief
. - On
Lesson map
, chooseAdd a microlesson
. Title: Mark the Focus. What it teaches: choose the one skill that will make the biggest difference. ChooseAdd to the map
. - Open the microlesson. On
Brief and links
, check that the lesson framework is FLOW. Fill in theMemory anchor
, for example: One skill, one focus. Fill in theCore insight
and choose theCritical step
. - Under
Library entries
, chooseAdd a persona
, then Maya. ChooseAdd a scene
, thenCustomer Feedback Conversation (Maya)
. - On
Lesson
, chooseWrite the outline
. Check the 12 FLOW sections and chooseAccept outline and write sections
. - Read each section and accept, edit or reject it. Open Practice Level 1 and check that the role-play steps use Maya.
- When the review box lists no gaps, choose
Send for review
and pick a reviewer.
8. Preview
Preview is a voice session with SAMI on the saved microlesson. You talk the lesson through with SAMI, as a learner will, before learners do.
How to preview a microlesson
- Open the microlesson and choose
Preview
. It shows once the lesson has steps, and not while you look at version history. - Choose
Start talking
. - When your browser asks, allow the microphone.
- Talk. SAMI leads you through the lesson step by step, and you answer as a learner would.
- Choose
End
to stop. The transcript stays on screen. ChooseStart again
for a new session, orClose preview
to go back to the lesson.

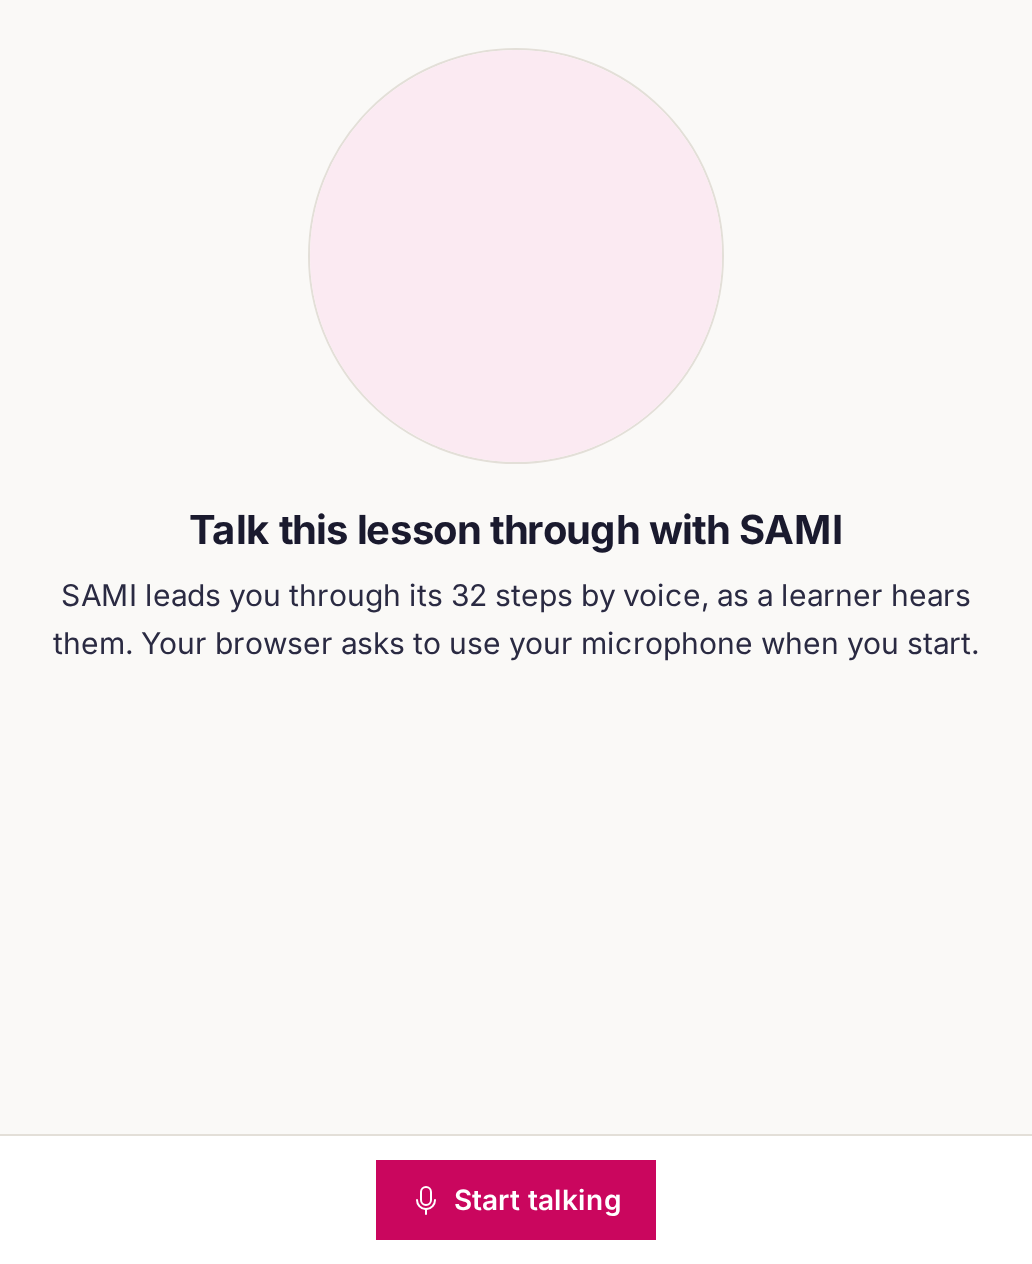
Preview uses the last saved revision. The top of the screen names it, for example Revision 12, as a learner hears it
. Close preview
or the Esc key also ends a session.
What you see during a session
Step N of M
: the step SAMI is on and how many steps the lesson has, with the step's name beside it.M:SS left
, for example9:42 left
: the time left in this session. A session lasts up to 10 minutes and then ends. The time changes colour in the last minute.SAMI is talking
orSAMI is listening
under the orb, and the transcript of what SAMI andYou
said. If you scroll up,Show latest
takes you back to the newest words.
If the session does not start
| Studio says | What to do |
|---|---|
Your microphone is blocked | Allow the microphone for this site in your browser's site settings. Most browsers open them from the icon beside the address bar. Then choose Try again. |
The voice session could not start | Check your internet connection, then choose Try again. If it fails again, report it (section 9). |
You've used today's 20 previews. More tomorrow. | Each person can start 20 sessions in 24 hours. Each session counts for 24 hours after you start it, so try again later. |
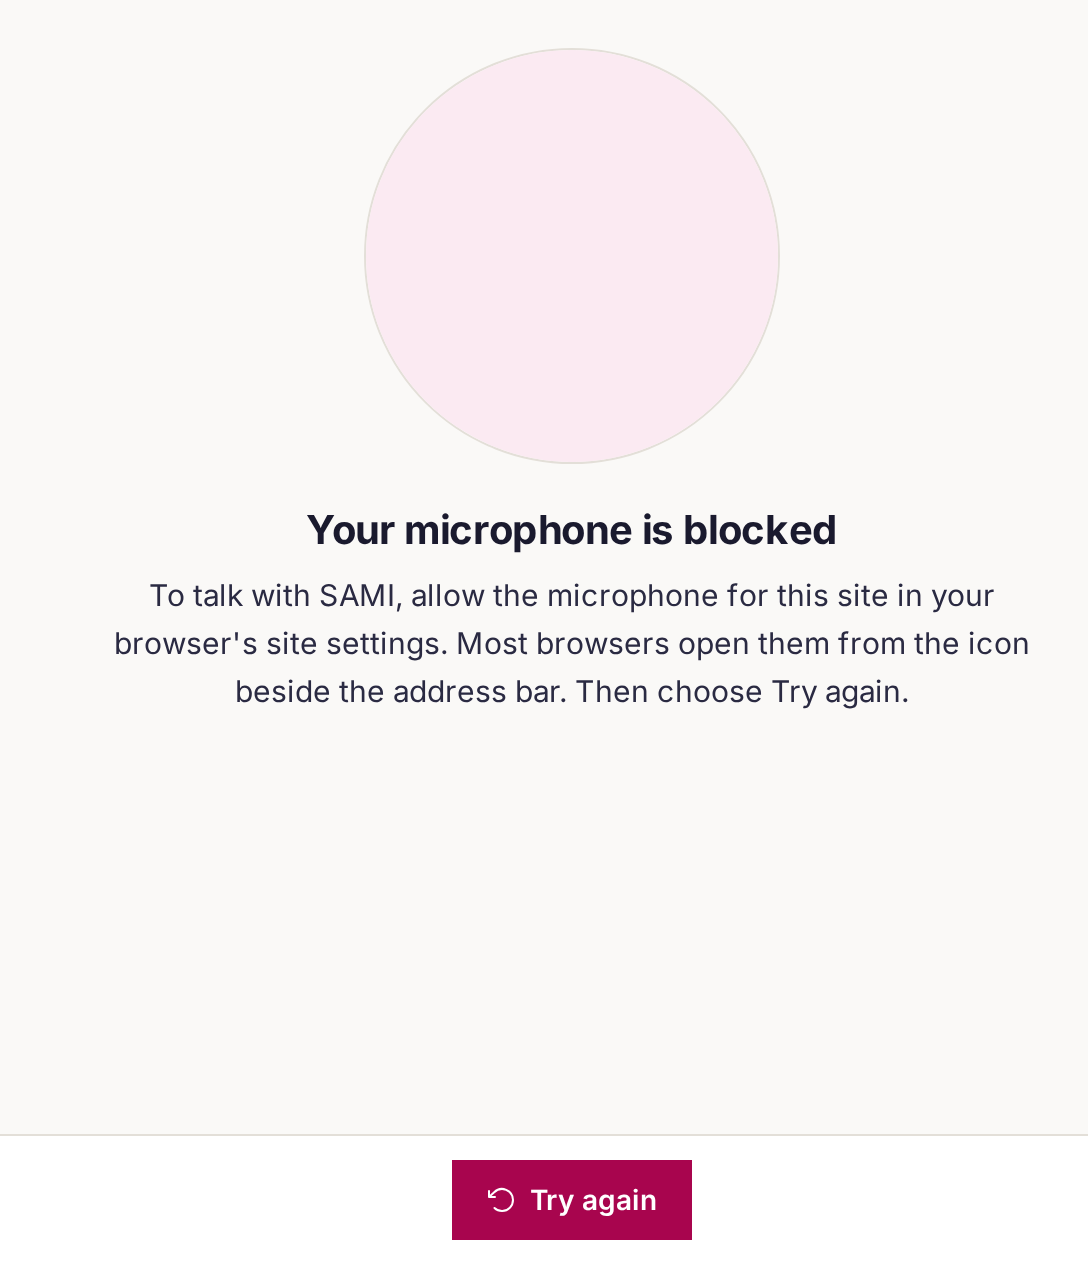
Try again(2).
9. Report a problem
Send each problem to Nikhil. Include:
- Page: where you were, for example the microlesson code or the page name.
- What you clicked: the buttons, in order.
- What you expected to happen.
- What happened, with any message word for word.
- A screenshot of the whole screen.
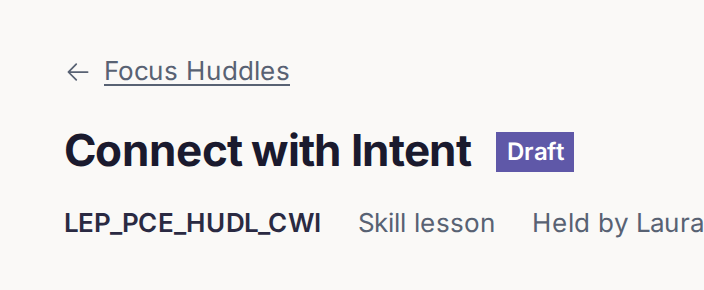
Example: LEP_PCE_HUDL_CWI, Preview. I chose Start talking and allowed the microphone. I expected SAMI to talk. Studio said The voice session could not start. Screenshot attached.